Checkly Agent Configuration
The Checkly Agent is a container that you need to deploy to run a Private Location in Checkly. The agent needs to be deployed on your infrastructure and executes checks on behalf of the Checkly application. For installation details, check the getting started guide.
The Checkly Agent has several environment variables that can be configured:
| Variable | Description |
|---|---|
API_KEY |
API key for the Private Location in which the agent will serve. The API key is shown in the web app once, when initially creating a Private Location. |
HTTPS_PROXY |
HTTPS proxy configuration for the outbound connection to the Checkly API, used for agent management and monitoring. https://user:password@127.0.0.1:8080 |
HTTP_PROXY |
HTTP proxy configuration for the outbound connection to the Checkly API, used for agent management and monitoring. Used if the proxy server does not accept HTTPS connections. http://user:password@127.0.0.1:8080 |
JOB_CONCURRENCY |
(Default: 1, max: 10) Number of concurrent checks that are run by the agent. |
LOG_LEVEL |
(Default: INFO) Set the log level of the agent. Can be one of DEBUG, LOG, INFO, WARN or ERROR. |
For example, you can add these variables to the standard docker run command like this:
docker run -e API_KEY="pl_...." -d checkly/agent:latest
Here are some more usage examples:
- Set the
JOB_CONCURRENCYto the appropriate value (1-10) based on your scaling calculations:
-e JOB_CONCURRENCY=10
- Configure an HTTPS or HTTP proxy if one is required for your environment:
-e HTTPS_PROXY="https://user:password@127.0.0.1:8080"`
Once the agent container is running, you can see it in a running state using the appropriate command from your container engine (typically docker ps).
CONTAINER ID   IMAGE                  COMMAND           CREATED       STATUS       PORTS     NAMES
72ec5591f6b2   checkly/agent:latest   "node index.js"   5 hours ago   Up 5 hours             lucid_shockley
- You can also check the logs of the new container to ensure it’s up and running (typically
docker logs <container_name>).
[checkly-agent] Starting Consumer c7495186-6f1e-4526-b173-14ee9ad21775
[checkly-agent] No jobs. Waiting..
[checkly-agent] No jobs. Waiting..
[checkly-agent] No jobs. Waiting..
[checkly-agent] No jobs. Waiting..
[checkly-agent] No jobs. Waiting..
Local Docker workflow
You can easily install the Checkly Agent on your Macbook, Windows or Linux machine for local debugging using Docker Desktop. The installation procedure is the same as described above.
To resolve locally running webapps or APIs, e.g. some project running on http://localhost:3000 you need to use the internal
Docker host http://host.docker.internal:3000 to bridge to your localhost address.
Updating the agent container
New versions of the Checkly Agent are released regularly. To have access to the latest improvements, you can update the Checkly Agent containers.
Manual updates
To manually uprade your Checkly Agent containers, first pull the image:
docker pull checkly/agent:latest
You can then start a new Checkly Agent using the updated image. If you no longer have the API key, you can always create a new one in the UI by rotating API keys.
docker run -e API_KEY="pl_...." -d checkly/agent:latest
Finally, you can clean up old Checkly Agent containers. First, run docker ps to find the names of the previous Agent containers.
CONTAINER ID   IMAGE                  COMMAND           CREATED       STATUS       PORTS     NAMES
72ec5591f6b2   checkly/agent:latest   "node index.js"   5 hours ago   Up 5 hours             lucid_shockley
db0aa54baf78   checkly/agent:latest   "node index.js"   6 days ago    Up 5 hours             quirky_lumiere
You can distinguish the old containers from the new ones by looking at the CREATED field. Then run docker stop <old container name> and docker rm <old container name> to remove the old Agent containers.
Automatic updates
Since the Agent is stateless, it can also be updated by replacing or updating the image in place. If you don’t have an existing process for upgrading containers, an in-place upgrade is easiest as it keeps the previously defined environment variables. While this approach can be more convenient, it should be used with caution since new Agent versions may have breaking changes such as deprecating runtimes. Breaking changes are communicated by increasing the major version of the image (e.g. from v1.3.8 to v2.0.0).
You can use the Watchtower tool to do an in-place upgrade of an agent container. Ensure you have sufficient agent capacity as the agent container will have a short outage as it is upgraded. As agent shutdowns are graceful, no running checks will be lost:
docker run --rm -v /var/run/docker.sock:/var/run/docker.sock containrrr/watchtower --run-once <container-name-to-be-updated>
Rotating API keys
API keys can be rotated as necessary in order to maintain good security practices or in case a key is lost or compromised. A Private Location can have two active API keys. To rotate the API keys:
-
Navigate to Private Locations in your Account Settings.
-
Click the edit icon on the Private Location you want to update.
-
There will only be a single API key in place on a new Private Location. Click Add new API key to add the second key.
-
The new API key will appear. Click the copy icon to copy it to your clipboard and save it somewhere secure.
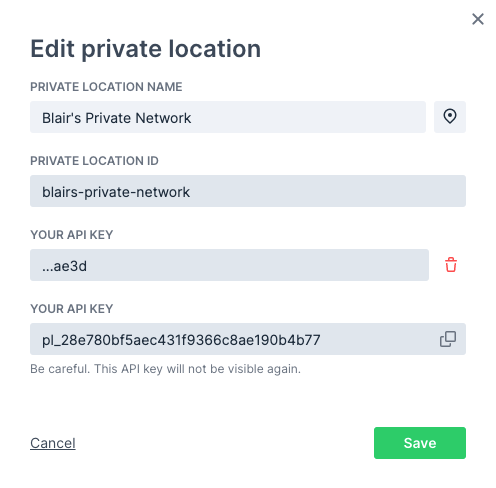
-
Click Save to close the dialog. You can now see the trailing characters of the two defined API keys in the list of Private Locations.

-
You now need to replace your Checkly agents. You can do this one-by-one or as a group, just make sure you always have enough agent containers up and running based on your workload. Using your container management tool, start new agents with the new API key:
docker run -e API_KEY="pl_...." -d checkly/agent:latest`
- Make sure the new agents are running properly. You can check the agent count on the Private Locations page, or check your container logs. Remove the old agent containers:
docker stop <old container name or ID>`
If you lose track of which agent containers are using the old API key, you can use the docker inspect <container name or ID> command and look for the API_KEY variable in the output.
- Now that your new agents are in place, remove the old API key. Click the edit icon in the Private Location again.
- Click the delete icon next to the old API key (verified by the shown trailing characters) then click the confirmation.
- Click Save to close the dialog. You will now only see the new API key listed for the Private Location.
Trusting Enterprise TLS Certificates
Some enterprise environments may use internal certificates for TLS connections. These certificates need to be trusted by the agent; otherwise, the agent’s TLS connection to the Checkly platform will fail.
To configure the agent to trust the certificate, first copy the certificate as a PEM file onto the host. The Docker run command should then be updated to mount the certificate as a volume and pass the path to the certificate in the NODE_EXTRA_CA_CERTS environment variable. For a certificate stored at the path ~/certificate.pem, the Docker run command will be:
docker run -v ~/certificate.pem:/checkly/certificate.pem -e NODE_EXTRA_CA_CERTS=/checkly/certificate.pem -e API_KEY="pl_...." -d checkly/agent:latest
Troubleshooting
If you’re using a self-signed certificate for your proxy, the Agent’s HTTP client will not trust it by default. There are two ways to fix this.
- Add your Certificate Authority’s (CA) root certificate to the system’s CA store. On Debian, and related Linux distributions, you can do this by copying your
*.crtcertificate to/usr/local/share/ca-certificates/and runningsudo update-ca-certificates. - Alternatively, you can tell the node process in the Agent’s container to accept unauthorized certificates with the following environment variable,
NODE_TLS_REJECT_UNAUTHORIZED=0. This can be appended to yourdocker run ..command with the-eflag.
Last updated on March 27, 2024. You can contribute to this documentation by editing this page on Github